Tuesday

Painting In The Rain -This Artists' Journey


Last week I spent four days at the most magical place on earth: Lake O'Hara in Yoho Provincial Park in BC. This is a place I have been to for the past 6 Septembers. The first time I went, we had 25 degree weather (celcius) and full sun each day. Since then we have had maybe 2 days of sunshine, but this year we had 4 full days of on and off rain -when I say on and off, I mean it changed every 15 minutes between sun, rain and sleet.!

On our first day, the sun came out for long enough to get us inspired to hike up to Opabin Lake. It takes work to hike your painting gear up the sides of mountains to reach glorious alpine lakes and golden larches. No sooner did I get set up and half the painting blocked in, when the mountain I was painting disappeared, shortly after which we were engulfed in freezing sleet. We were instantly frozen and it was all I could do to put my stuff away and back into my pack and run for cover in the forest below us.

The next day vacillated between snow and rain. So the question was: do I set up and paint in the wet and cold? I decided that painting is why I was there, so I set up beside a small creek near the Elizabeth Parker Hut where we were staying, and got in a little 8x10". One thing about the rain is that it brings out all the incredible colors in the landscape, where in the sun all those subtle colors are wiped out by the light. My plein air umbrella saved the day and kept the painting relatively dry. Luckily it wasn't windy -heavy wind is the only condition in which it is impossible to paint en plein air, as everything blows over, no matter how you try to anchor your tripod. I have made many monoprints on my painting shirts!


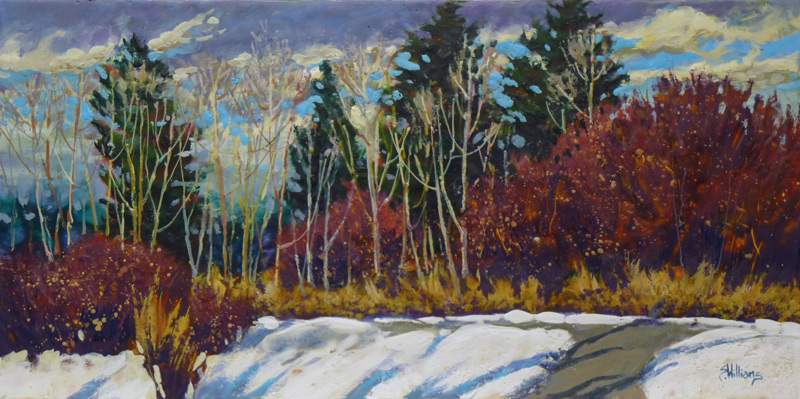
This is what my camera captured. What you don't see is the amazing array of colors in the creek and the foliage. THAT'S why I paint en plein air, rather than from a photo! The colours in the painting are what I actually saw with my eyes. Now I have to admit I have a highly developed ability to see colour. They are there, but most people don't notice them unless you point them out. 

"Rainy Creek", 8x10" plein air oil

On the third day the weather continued to be bleak and I opted to go hiking instead. We hiked up to Lake Oesa, passing Victoria Falls on the way -had to stop and make a small pen and ink and watercolour sketch. Then we took the alpine route via Yukness Ledges to the Opabin Plateau. I had never been up on the Ledges before and it was thrilling to scramble around the huge rock fall and look down to turquoise Lake O'Hara far below us. Without 30lbs of painting gear on my back, the hike was surprisingly easy. We explored the whole of the Opabin Plateau where there is wonder at every turn. As I already mentioned, photos don't do the area justice, but here are a few pictures from our hike.
On our last day the sun was peaking out a bit more frequently so I decided to give painting another shot. I set up in front of the cabins on Lake O'Hara, determined to challenge myself.

"On The Edge", 12x12" plein air oil
And what a challenge it was. The rain was coming from many different angles and I had my umbrella between my legs in an effort to keep the rain off my painting and off myself! But weather aside, the optical challenge was incredible. First, there was the reflection of the bushes and trees in the water (remember the color is saturated in the rain?). Then there were rocks that were sitting in the water, half of them were sticking above the water and which cast their own reflection onto the surface of the water, and the rest of the rock was below the water, influenced by the depth of the bottom of the lake. At depth the lake is a remarkable turquoise, but as it gets shallower, the colour changes to the red orange of the silt on the bottom. Now most artists would SIMPLIFY the scene, but I decided to see if I could capture what my eyes were seeing, rather than try to impose my own design and color sense into the painting. I don't know if it is a great painting, but I think I was successful in rendering what it actually looked like to be standing there at that moment. All that heavy thinking kept my mind off of my freezing fingers anyway :)

Enjoy!
Sharon

Share |

Wednesday

Bad Blogger with new work!


Hello there faithful followers! I really must apologize for my lack of persistence with posting to this blog. I have been busily painting away, but blogging has escaped my previous enthusiasm. I hope that you will bear with me as I post occasionally when I have something of substance to say.

So here is more than you probably wanted to hear about being an artist blogger. Part of the truth is that there is so much more involved in it than just posting a photo -firstly, there has to be a photo! So that means I need to wait for the work to dry (plein air oils) or they will photography with unsightly shine. Then I have to wait for an available sunny day in mid afternoon to cart all my work out and take photos. This often means having to repeat the process once I find that my photo did not capture the accurate color or texture. Next the photos need to uploaded to Photoshop Elements where I get rid of any parallax because I unintentionally didn't get square behind the camera. Also, there is usually other colour and value corrections to be made. Sometime, I realize that the painting isn't finished, so it goes back to the studio for updates, which may take weeks to get to. Then I have to save it in a lower resolution for placement on the mighty internet. THEN I have to think of something clever or helpful to say to you, my wonderful friends, about the work. It is sometimes (often, my failing) really hard to talk about my work. It is a very raw and vulnerable feeling to put one's work out there for all the world to see and judge.

SO, that is why I don't post that often any more. Truth is, I would much rather spend all that time painting! We are told by marketing gurus (the artists who are making their living by telling other artists how to sell their art -hmmm, why aren't they just selling their own art??? But I digress..) that in order to be successful in online marketing, one must post daily to one's blog, several times a day to Facebook, daily on Instagram and update one's website on a weekly basis. Gosh, I am exhausted just thinking about that! They say followers are everything, and imply that the quality of the artwork is secondary to this big marketing machine. I have seen that many have gotten on this bandwagon, and many are being successful in producing good sales of their art online. I am on Daily Painters (ha, I am certainly not a 'daily painter' as in one who produces a small painting every day and puts it up for sale for cheap), and I have sold a few paintings there, but mostly I renege on posting there either. My small work is usually done 'en plein air' and my galleries would really frown if I offered it up at a fraction of the price for online consumption. So my prices are much higher than many of those daily painters. So I sell less. Oh well, that's the way it is.

I am much more interested in using this blog as a forum for ideas about painting and all art in general, rather than as a marketing tool. Don't get me wrong, I would love it if you would buy a painting from me! But I just don't have the stamina to work that hard at the marketing end of things. Luckily I am blessed with a wonderful, super supportive husband, who also happens to have a wonderful pension, so I don't have to sell my work in order to eat (maybe that is why I am not as skinny as I used to be...).  You have caught me in a very wry sense of humour today, sorry.

To that end, I am delighted if you will share this art journey with me. Hopefully I can give you something of interest to enrich your life with. So here is a painting that I did while standing on the rocks in the water at my cottage this summer. Didn't even fall in, but I did inadvertently wash some art gear in the process!

"Tied Up",  12x12" plein air oil on board
$575 beautifully framed

I was really interested in the way the light hit the water and made it a golden glow in contrast to the cool shady areas, and in the reflected light on the trees. I am always a sucker for light effects, and I try really hard to capture them using colour and opacity/transparency to tell the story of what I felt as I was looking at the scene. Hope that comes through! I also did another 2 paintings at the cottage, but one is drying after a repaint, and I thought I would save the other for another time when I can think of something else interesting to tell you about.

As always, I invite you to comment on this post, and to share it on social media using the Share link below.

Blessings
Sharon

Share |

Sunday

Sedona Paintings by Sharon Lynn Williams


"Cathedral Rock -Sedona", 7x12" plein air oil on board
$195 unframed

I see that I forgot to post some plein air paintings that I did in Sedona at this time last year. I am revisiting them because these paintings will be available at the Leighton Art Centre Annual Clothesline Sale coming up this June 6 & 7.


This is a great opportunity to get some wonderful unframed artwork by many different artists in many different styles, and at great prices to boot.

 "Cathedral Rock From Crescent Moon Park", 9x12" plein air oil
$225 unframed

"Chapel Rock, Sedona", 12x16" plein air oil on board
$250 unframed

Plein air painting in the gorgeous red rocks of Sedona presented this Alberta girl with some unique challenges, as we have nothing like this anywhere near here. The red rock has glowing vibrant shadows, which all contrast nicely with the green and grey green foliage surrounding them. and the brilliant blue of the sky -such a riot of colour really makes my heart sing.

I chose to portray the shadows with a transparent violet in the last two paintings, and I think it really conveyed the cool yet still warm shadows well.  There was a real challenge in painting these intricate mountains as the shadow shapes kept changing. The only thing to do is to block in the shapes as they are at the beginning of the painting and then stick to them for the duration. Chasing the sun is never a good idea in plein air painting.

Enjoy!


Share |

Friday

New bird painting by Sharon Lynn Williams

"Robin & Mountain Ash", 6x6" oil on panel

I spent Friday painting with my friend "Marjorie Mae", aka Marj Broadhead. I had prepared a couple of photos and we set the timer for 1 hour for each 6x6" painting. It was so much fun! (You can look on her FB page to see her interpretations). This was my first one. I was sure happy that I had set the timer as it kept me from picking it to death! I like the subsequent looseness.

"In The Tree Tops", 6x6" oil on panel

Here is my second birdie. You might be interested in the support I used. I got my dear hubby to cut up some 3/4" hardboard into 6x6" squares.. Then I put one layer of GAC100 on tops and sides to seal them from the lignans escaping and discoloring my painting (see support induced discolouration or SID).Then 2 coats of gesso followed, sanding in between and at the end to make a smooth surface. I find this very similar to the Ampersand boards at a fraction of the cost. If the painting is successful, my DH just drills a hole in the top middle on the back to accommodate a nail on the wall, I paint the sides of the panel black, and tada, I have a hangable art piece. That way I can sell them inexpensively, a deal for the customer, and easy with no framing for me. Please feel free to steal this idea for yourself!!

Enjoy!
Share |

Saturday

"Afternoon Tea", new oil painting by Sharon Lynn Williams

"Afternoon Tea", 12x12" oil on panel
$575 beautifully framed

I painted this from a still life I set up. The teapot gave me great grief, but I am happy with it now. Sometime that's just how it goes. There is a bit of glare in the darks in this photo, sorry.

I want to take this opportunity to wish you all a very happy Easter -He is RISEN!!

Enjoy!
Share |

Thursday

"Fall Remnants", encaustic painting by Sharon Lynn Williams


"Fall Remnants", 12 x 24" encaustic on panel
$895 beautifully presented in a hand crafted frame

This is my latest encaustic painting, which captures the scene on one of my daily walks. Here, the weaselhead area of the Elbow River is seen through the large aspen trees growing on the cliff above. 

I am planning some encaustic classes for this spring to be held at Swinton's Art Supply here in Calgary. I will let you know the details as they are finalized.

Enjoy! 
Share |

Wednesday

New Encaustic Paintings by Sharon Lynn Williams

 "A Walk In The Park", 12x24" encaustic
$895 beautifully presented in a hand crafted frame

I have been in the encaustic studio a lot lately and have found a method that really works for me. I saw this scene on one of my daily walks, and came right home and painted it. In this painting, I made an underpainting in complementary colours using gouache on the raw panel. So under the burgundy trees, there is green and under the green trees there is red. Bits of that underpainting shine through in spots and gives a nice sparkle to the painting. Gouache is compatible with putting wax on top, unlike acrylic or oil paint, and isn't affected by the heat used to fuse the wax.


"Montana Gold", 18x24" encaustic
$1225 beautifully presented in a hand crafted frame

I did this painting at a friend's cabin in January. On our drive to Montana, we passed this scene and I knew right away I had to paint it. I began without an underpainting, but put the first layers of colour right on the raw board without putting several clear layers of wax first, as is the 'normal' technique. I find this makes the colours float around less when fused -a definite aid when trying to paint representationally, albeit impressionistically. There is a good amount of texture in this piece. The only problem with encaustic is trying to capture the colour and luminosity with a camera! You really need to see this work in person to appreciate it.

These two paintings will be in the upcoming FCA show this Saturday, as well as the previously posted "First Snow II", which I am thrilled to say, won an honourable mention. I will also have 2 plein air oil paintings at the show. I am doing an oil demo from 1-3pm, so please stop by and say hi if you can.


Enjoy!
Share |

Friday

"Evening Light-France" new oil painting

"Evening Light -France", 9x12" oil on panel

I was fortunate to have some time to paint today. This is from a photo I took in 2014 outside Le Vieux Couvent in Frayssinet, France, while I was on a Dreama Tolle Perry workshop -so inspiring!!

I am teaching a "Colour Mixing Made Simple" class this coming Monday night in Calgary from 6:30-8:30pm. The cost is only $35 and includes all supplies and a glass of wine. Go here to register.

Enjoy!
Share |

"A Seat For Beauty", new oil painting by Sharon Lynn Williams

"A Seat For Beauty", 9x12" oil on panel
$495 beautifully framed

I know I have been derelict in my duty to post, but I do have a good excuse this time. I came down with shingles a week ago and it really knocked me out. I am happy to say that I caught it early and was put on antiviral meds, plus I was directed to a new cream that has done wonders on the healing of the rashes. I am now on the mend, and hope to make more of an effort to post. Not that you aren't already inundated with things to see online, but I hope I can bring some beauty into your lives with my paintngs.

I am taking an online class with the wonderful Dreama Tolle Perry, and our assignment for this week was a blue chair in France with geraniums growing from it. Well, it turns out that I was right there in that place taking photos with Dreama as part of my France workshop in 2014. So I chose to paint from my own photo, which is quite different from the one the class painted. If you can possibly swing it, I HIGHLY recommend taking Dreama's online course which will open again in September. I have taken 13 days painting with Dreama in person, and I must say that this course is an even better experience than the live workshops. You get to see everything she does close up, but more than that, Dreama has opened up her heart by adding so much more besides painting, going into attitude, perseverance and painting with JOY. Go to her website and take a look.

Enjoy!
Share |

Wednesday

First Snow i in new frame style


"First Snow i", 12 x 24" encaustic
$895 beautifully framed

What a blessed lady I am to have a wonderfully supportive and creative husband!! He just finished this gorgeous frame for my new encaustic painting. He designed the frame to be a shadow frame with 1/4" show around the edges, so that none of the image is cut off. It is set back into the frame which will protect the wax from damage due to rough handling. We went through a bit of a learning curve trying to find the correct finish for it, and ended up with a satin black that just makes the painting glow. The painting was done on a standard 2" thick cradled birch panel, which he sawed down to a 1" cradle on his table saw -YES this was risky but he is meticulous so I had no almost no fear. And just in case you thought that was all, with the remaining 1" cradle he made me a new panel!

As I want to be as helpful to other artists as possible, I am including a photo of the back of the frame so maybe you can make one for yourself (or if you have a significant other who is handy).


It is wrapped up for delivery to my gallery in the morning, but you get the idea. He used 1'3" Radiata Pine for the top and then he glued and screwed on a lip of hardboard on the back to screw the painting in. It is all very secure and sits flat to the wall. His next project is to make me a similar frame for the 24x48" version.

Enjoy!
Share |

Friday

"Coming Home", encaustic painting by Sharon Lynn Williams

"Coming Home", 12 x 12" encaustic on panel
$450 framed

I just returned from a wonderful trip to Montana to paint with friends for a week. Unfortunately we were plagued with problems: a death in one of the families plus power outages on two days (spells disaster for working in encaustic!) However it was a rich time of bonding, sharing art techniques and sharing our faith. I did this painting first there, and was able to do one more which I will share later, once I am sure it is finished.

If this weekend taught me anything, it is to expect the unexpected, and that LOVE really does hold us all together.
Enjoy!
Share |

Sunday

new encasutics First Snow i & ii


"First Snow i", 12 x 24" encaustic on cradled panel
$895 beautifully framed

So now that it is winter and it is too cold to paint outside, I am back in my studio working with the wax. I painted this in my friend, Tracy Proctor's beautiful encaustic studio. When I brought it home my hubby said "I REALLY like this -wish it was bigger!" He immediately went out to the lumber store and bought me a 24x48" piece of baltic birch and made a cradle for it so it wouldn't warp while painting. It took me 16 hours, but I just completed it, the largest encaustic painting I have done to date!

"First Snow ii", 24x48" encaustic on cradled panel
$2895 beautifully framed

It is really different working this large. I found I needed to make small containers of a bunch of colour variations so I had enough of each colour to cover a large space. My usual practice is to have one griddle with large containers of a few key colours that I use to mix other colour variations from, as well as a large pot of clear medium and a container of soy wax to clean my brushes in. I use the other griddle as a mixing palette, where I put out small amounts of colours from manufactured or home made wax pigments and then add small amounts of other colours to get a huge range of colour options. In my work I love to have a range of lights, mids and darks of equal value so that I can get colour variation =life. If you click on the large painting image, you can hopefully see what I mean. For example in the snow shadow area there are 5 different values (light to dark) of blue grey. I bought some small stainless steal condiment cups at a local restaurant supplier, so I could have a container of each of those values. Add to those multiple cups of lights including creamy whites, yellows, greens and blues that appear in the sky behind the trees, as well as multiple mid-value cups containing yellows, oranges, reds, blues, greens and violets. But I think all those colour variations is what brings pop and life to the painting, so it is well worth the work. I was thrilled to find some silicone mini-muffin cups at the store, so now I can put the colours that are left over into those, allow them to cool and add the blocks to my collection of colours, rather than having to throw them away.
My son commented that I need to do a series of these, so I think I will take him up on that idea -stay tuned to see more .

Enjoy!
Share |

Monday

FLUID ACRYLIC WORKSHOP THIS SATURDAY JAN 16, 2016


FLUID ACRYLIC WORKSHOP WITH SHARON LYNN WILLIAMS
Saturday January 16, 2016 from 10-4pm at Swinton’s Art Supply, 7160 Fisher Street, SE, Calgary 
 Come and join me to learn about the benefits of using fluid acrylics in a watercolour manner. Some of these include the ability to move into translucent and opaque effects, superior glazing ability without the possibility of making mud, and outstanding clarity of colour in the final result, not to mention no glass is required when framing.
Class size is limited to 10 students
Cost: $110 plus GST. Call Swinton’s at 403-258-3500 to register, or contact me at 403 238 4744


Share |

Saturday

Jane Davies Monoprint Collage Online Workshop Review

In November I signed up to take Jane Davies online workshop called "Monoprint Collage" with two of my students. We decided it would be fun to take the class together and have weekly joint painting sessions in order to spur each other on to greatness finishing well. I thought I would share some of the paintings I made over the 6 week class and some observations I made during the process.

The class began with 2 lessons on making collage papers with the Gelli Plate.  We learned all kinds of techniques to use with the Gelli plate including using stencils, rainbow rolls, manipulating paint, using resists such as string, and multiple layerings. Here are just a few of the papers I made, out of the nearly one hundred we made. You will have to click on the link to see the papers at a larger size. All papers were made on 80# Sulphite Drawing Paper.

In lesson 3 , we made paintings with our collage papers, cut into squares or rectangles. The challenge was to balance the positive and negative spaces, and to use the pattern in a way that would encourage the viewers eye to roam all over the page. Here is an example of 3 of my finished collages.


I was pleased to be able to make a successful composition with only 4 collage pieces!

In lesson 4 we used 'orb' shapes out of our collage papers and the challenge was to paint an interesting background behind them, and add elements (scribble or more collage) to make a finished piece. Here is my favourited of the bunch I made -all 8x8":


In lesson 5, we began by printing directly from the Gelli plate onto our substrate. either before or after adding collage, and playing with opaque and transparent paint layers. So it was print, mask, print, glaze with opaque or transparent paint and then do whatever it took to make a finished work.  These are 3 of the ones I did, all 8x10":


In the last lesson, we began by printing and then adding collage, stenciling, glazing and opaque layering as well as adding linear elements and whatever else we felt led to do. Here are process shots of 4 of the 7 paintings I made.


A goal I had at the start of the workshop was to get more minimalistic in my approach, which you can see I failed miserably at. This goes to support my mantra that my body of work is called "Products Of A Busy Mind"!! Jane did a wonderful job of presenting the class, with a PDF of instructions along with 1-2 videos per lesson. The class had a private blog page so that we could post our work, which multiplied the learning seeing what other people did. It was fun to comment and receive comments on each others work, as well as Jane commenting on each of our posts. I learnt so much in the class, and I now know my Gelli plate will not be relegated to making papers for collage only. If you have an opportunity to take an online (or live) class from Jane, I highly recommend it. You can view Jane's great website which contains her wonderful artwork, an amazing blog and tons of free tutorials on her methods.

Enjoy!
Share |